Saturday, 19 March 2011

Red Nose Cake Balls


I'm really sorry for posting this late, I know its not Red Nose Day anymore but I still wanted to share these with you.  Yesterday ended up being far busier than I expected and I only had time to take the photo's.  So for anyone who doesn't know, it was Red Nose Day yesterday for Comic Relief where they try and raise as much money as possible for vulnerable people here in the UK and in Africa.  


I just so happened to be going to a little house warming party last night with my Mum and decided that some kind of Red Nose themed cake was needed.  So, inspired by the lovely Bakerella, I decided to make some cake balls since I didn't have any lollypop sticks needed for Cake Pops.  I wanted them to be roughly the same size as the actual red nose's that you buy in the shops, so they were pretty big. 


Anyways my idea didn't really go to plan as you can probably tell, they didn't end up like I wanted looks wise but they taste amazing.  Who knew that just by mixing sponge cake and buttercream together that you'd get such an incredible tasting cake!  I will definately be trying to make them again, my only problem is covering them with melted chocolate. 
Now, anytime I try and do anything with melted chocolate I end up in a right mess.  Chocolate everywhere, nothing looking how I wanted and the chocolate always starts to harden before I've had chance to do anything!  But I won't give in, I am going to master working with melted chocolate...one day...


For the chocolate cake and buttercream I used the same recipe as I did here for my Mint Choc Chip cupcakes just without the chocolate chunks and peppermint essence. 
They are really simple to make, just crumble up your chocolate cake into a bowl and add in the buttercream.  Give it a good stir to mix it all together and once combined you can take out spoonfuls and shape into balls.  Place the cake balls onto a tray covered with greaseproof paper and chill in the fridge for a few hours.  Finally you can cover them with melted chocolate (I used white chocolate with red food colouring) and decorate however you wish. 
My plan was to try and make them look just like the Red Nose's that I'd bought but after the mess I had with the melted chocolate I gave up and covered them in edible glitter instead!

Wednesday, 16 March 2011

Lime and Coconut Cupcakes


Apologies for the slowness of posts lately, I don't always get the chance to take photo's when I'm baking.  Just lately I'm baking a lot with my little Nephew which is incredibly fun as he sings along when he's helping me but I don't get much chance to take photo's and when I do it's usually of him!

A few weeks ago I made these lime and coconut cupcakes, I had the idea because my Mum came home from work one day atfer discussing my baking with a friend and the friend told her how her boyfriend made the most amazing lime and coconut cake.  Lime and coconut is not a flavour that I've experimented with before, so I was up for giving it a go.


The cake mix is slightly adapted from my Cupcakes, Cheesecakes and Cookies book whilst the buttercream is of my own making.  At first bite I wasn't too impressed by them, I thought the cake a little on the dry side but after the next mouthfull and the next I couldn't get enough.  The more I ate the more I wanted, I think I definately ate more of them than anyone else in the house!


Lime and Coconut Cupcakes - Slightly adapted from The Complete Book of Cupcakes, Cheesecakes and Cookies

125g margarine
1 tsp vanilla extract
Finely grated zest of 1 lime
145g caster sugar
2 eggs
80ml milk
60g desiccated coconut
188g self raising flour
1. Preheat the oven to 180c and line your pan with cupcake cases.
2. Beat margarine, vanilla, zest, sugar and eggs until combined.
3. Stir in the milk and coconut. - I'm not going to lie, at this stage the mixture looked pretty gross so I was very surprised when it all came out ok!
4. Then stir in the sifted flour until combined.
5. Divide mixture amongst cases and cook for about 25 minutes.

Lime buttercream - my own recipe

75g margarine
150 - 200g sifted icing sugar
Finely grated zest of 1 lime
Juice of half to 1 lime
Green food colouring - I just added a little for a nice pastel green shade

1. Beat margarine until soft.
2. Add in a few tablespoons of icing sugar at a time and beat until combined, leaving about 50g icing sugar left.
3. Beat in zest and half of lime juice.
4. At this stage its completely upto you what you do next, try the buttercream and see if you like the lime taste.  Add more if you need to.  Also tip the bowl on its side, if the buttercream drops quickly then add more icing sugar and beat again until the consistency gets a bit thicker.  If you plan on just spreading the buttercream on top of the cupcakes with a knife like I have then it doesn't need to be as thick as it would if you were piping.
Lastly add the buttercream to the tops of your cupcakes and cover with more desiccated coconut.  To make this easier you can pour the coconut into a cup and just dunk each cupcake upside down into it and tap off any excess.

As it's Red Nose Day on Friday I have a few idea's which I'm rather excited about.  So pop back Friday and as long as I don't have any major disasters I should have something fun to share!

Friday, 4 March 2011

Chocolate Fudge Brownie Cake


I'm pretty certain I've found my go-to brownie recipe.  I know only a while ago I was saying how I had yet to find that elusive perfect brownie recipe, and all the while the recipe was sat on my desk waiting for me to use it.  I had printed it out months ago and put it in my recipe book amongst all the other print outs that are waiting for me to stick in or throw out.  A friend had mentioned how great this recipe was and I made a mental note to hurry up and bake them, but I guess that mental note got lost, along with the things that I needed for the shop... 
Anywho a couple of weeks ago I realised I still had not made them so I went ahead and did it, and oh my, they are amazing.  A lovely crusty top, perfectly gooey in the middle and a deliciously chewy bottom.  Everything I ever wanted in a brownie.
The recipe itself comes straight from the BBC, only I added some left over clotted cream fudge that I had lying around.

Chocolate Fudge Brownie Cake - from the BBC

100g margarine
175g caster sugar
75g brown or muscovado sugar
125g chocolate (plain or milk)
1 tbsp golden syrup
2 eggs
1 tsp vanilla extract
100g plain flour
½ tsp baking powder
2 tbsp cocoa powder
100g fudge - optional


1. Heat oven to 180c, grease and line a 20cm cake tin.
2. Gently melt the butter, sugars, chocolate and golden syrup in a pan until smooth.  Remove from the heat.
3. Break the eggs into a bowl and whisk until light and frothy.
4. Add the eggs and the remaining ingredients into the chocolate mix and stir well.
5. Pour the mixture into the tin and cook for about 30 minutes.


Enjoy!

Wednesday, 26 January 2011

Flapjack


So at first I wasn't going to post this, I mean flapjack isn't the most exciting thing to find on a baking blog but sometimes you need something simple and classic which is exactly what flapjack is.
I have always, and still do, hate shop bought flapjack.  I can't stand the stuff.  It tastes of cardboard, smells like cardboard and looks like cardboard.  Theres only one shop bought flapjack that I've ever kind of liked.  I'm lucky to have a great little bakery only two minutes away which we often frequent, and they do an amazing flapjack which is half covered in chocolate.  This is the only flapjack I've eaten in years, aside from my Mums occasional homemade version.  Whilst my Mums is great, it has a tendancy to break your teeth if it's left longer than a day.
And so my mission to find a truely great flapjack begins.  I think anyone keen on cooking or baking has a few different recipes that they are always in search of improving and finding the best of.  With a lot of baking bloggers it seems to be the elusive perfect brownie.  Of which I am still looking for.  For me I want to find a really good flapjack recipe, as I don't think you can go wrong with good basic recipes. 
This particular flapjack recipe I found when watching the BBC's new baking programme 'Baking Made Easy' presented by model turned baker Lorraine Pascale.  I'm enjoying the programme so far, the recipes are really simple and easy to follow and she's covered some good basic's as well.

You can find the recipe here.  As for my verdict on the flapjack?  Its lovely and soft and chewy, a great flavour too.  But for me its just not sweet enough, I do agree with the recipe that it would be great as a quick breakfast.  Though maybe mix in some dried fruits at least.  Definately one to try if you don't like your flapjack too sweet.

Sunday, 23 January 2011

New Year

I apologise for the lack of any posts these past few months, I just haven't felt like blogging at all.  I've still been baking plenty but I've just not wanted to post anything.  So I'm sorry for the quiet but I am back and in the right frame of mind.  This is just a quick update to show that I'm still here and still baking and there are lots of treats that I want to share with you.

Here's a sample of what I have made these past few months...
A Thomas the Tank Engine cake for my Nephew's 3rd Birthday party.  My first time at attempting any kind of theme, let alone such a well known character!  I also made chocolate and vanilla fairy cakes with Thomas the Tank Engine cake toppers.

A variety of gingerbread in readyness for Christmas. 


My first attempt at making Sorbet, a wonderful orange flavour but a bit too icey compared with sorbet's I love in restaurants.


And finally Triple Chocolate fairy cakes for a party that my Mum held.

Thats it for now but I'll be back in a day or two with flapjack!

Sunday, 21 November 2010

Tiffin/Refridgerator Cake

 
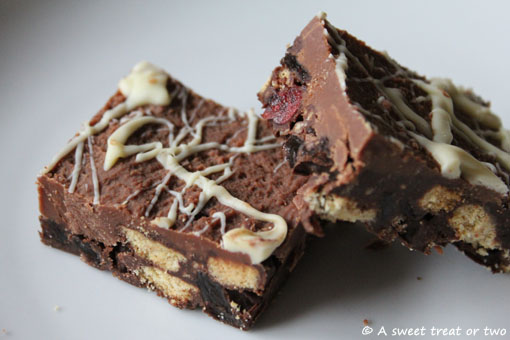
Tiffin or Refridgerator Cake, whatever you want to call it, is one of those things that you can make quickly without too much hassle and without worrying about weighing everything perfectly.  All you need to do is chuck a load of things into some melted chocolate, butter and golden syrup and you're nearly done. 


This ease and no fuss style is represented by my Mums recipe for Tiffin, well if you can call it a recipe that is.  It's a small scrap of paper on which is written "biscuits, choc, golden syrup, sultana's, cherries, 2oz marg".  Thats it.  Only one actual measurement, no step by step instructions, no faffing about.  Just simple and straight to the point.

So when I decided to whip some up a few days ago, I combined this list with a recipe I found in Cupcakes, Muffins & More by Love Food.  My Mum got me this recipe book a few months ago and I've not got round to using it much yet.  The first thing I made from it was some melt in the middle chocolate cupcakes which you serve warm and they were very successful, apart from the fact that my camera broke whilst taking photo's of them!


When I made these I slightly underestimated how much chocolate I needed as I didn't really have a lot in the house, so I just went ahead anyway.  It wasn't a disaster but I did end up with one half of the tray not having any chocolate topping!  I also had a minor problem when I was melting some chocolate, I did it the way you are supposed to i.e. in a bowl over a pan of gently simmering water.  Yet it did not turn out, I seem to be incapable of melting chocolate this way.  Which is why I tend to just stick the bowl in the microwave for 10 second bursts until its all melted! 
Mishaps aside, it turned out ok in the end, it even looked pretty good once I cut it all up.

Tiffin/Refridgerator Cake - Adapted from a few different recipes

75g margarine
3 tsbp golden syrup
350g chocolate, roughly chopped (I used a mix of milk and dark)
175g digestive biscuits, roughly broken
70g glace cherries
80g raisins

For the Topping:
35g margarine
250g milk chocolate

Decoration (optional):
50g white chocolate, melted

1.  Grease a cake tin of your choice, deep or shallow depending on how you thick you want your cake.  I used a tin that was about 27x18cm.
2.  Put the chocolate, margarine and golden syrup in a small pan and heat gently until melted. 
3.  Bash up the biscuits and add to the chocolate mix, along with the cherries and raisins.  Stir until combined.
4.  Pour into the tin and roughly level the surface.  Chill in the fridge for about an hour.
5.  Melt the milk chocolate and butter, then pour over the chilled mix.  Put back into the fridge until set.
6.  Melt the melt chocolate and roughly flick over the top of the cake with a spoon.  Put back in the fridge and let it set.

Wednesday, 3 November 2010

Mint Choc Chip Cupcakes


My favorite flavour combination is and always has been Mint Choc Chip, I can't get enough of it.  I love mints and I love chocolate, so the two together is just heaven to me.  I'm not a big ice cream eater but I could eat Mint Choc Chip ice cream by the bucket full.  I found a little ice cream parlour near the edge of Lake Windermere (Lake District, Cumbria) one holiday a few years back which did the most amazing Mint Choc Chip ice cream, I've never found anywhere thats come close.


Anyway, enough rambling about ice cream and onto the cupcakes.  I've been meaning to make these for a while but kept forgetting or not having the time when I did remember.  Then someone else made some and it reminded me. 
I had the recipe in mind, I was going to use my favourite victoria sandwich recipe but with cocoa powder and chocolate chunks and then my favorite buttercream but adapted to be mint chocolate.  Pretty simple I thought.  I made the cakes no problem but then came the time to make the buttercream, I had the butter and half the icing sugar mixed nicley when my whisk suddenly stopped.
Thinking it may have just got a little hot I turned it off and unplugged it for a few minutes.  Then I plugged it back in and tried again, this time it made a painful whirring sound and tried its best to work.  No such luck.  There was no way it was about to work.  So my only option was to finish it by hand, I know, I know, nothing wrong with that, unless you have problems with your muscles like I do.  To cut a long story short I eventually finished the buttercream, it took me probably 30 minutes longer than it does with the whisk.  As for the taste?  Its without a doubt the nicest buttercream I've ever made.  So creamy, soft and fluffy, I had to add milk to make it a little easier to beat, which I never usually do and the taste was so much better for it. 
Verdict?  Having very painful, dead arms for over 4 days afterwards was totally worth it.


Mint Choc Chip Cupcakes - My own recipe

For the chocolate chip cupcakes:
100g caster sugar
100g margarine
75g self raising flour
25g cocoa powder
2 eggs
100g milk chocolate, roughly chopped
1 or 2 tbsp milk (its upto you how much, but generally if the mix is quite thick then add a spoonful or two)

For the mint chocolate buttercream:
75g margarine
150g icing sugar
40g cocoa powder
2 tbsp milk
1 tsp peppermint essence (roughly)

1.  Cream the margarine and sugar together until light and fluffly.
2.  Add one egg and a spoonful of flour, beat until just combined.  Repeat with the second egg.
3.  Fold in the rest of the flour and cocoa powder, one spoonful at a time until you have a little bit of flour left.
4.  Fold in the milk and finally the last of the flour until it has just combined.
5.  Add in the chocolate chucks and stir as little as possible to mix them in.
6.  Spoon the mixture into muffin cases until 3/4 full.
7.  Cook on 180c for about 15 to 20 minutes until a cocktail stick inserted comes out clean (bar any melted chocolate).  Put on wire rack to cool.
8.  Now to make the buttercream.  Beat the butter until it is nice and soft and fluffy, then slowly add the icing sugar.
9.  Add about half the cocoa powder and beat, then put in a spoonful of milk and mix.  Repeat with the remaining cocoa powder and milk.
10.  Add the peppermint essence a few drops at a time.  Keep tasting until you are happy with the flavour.
11.  Pipe the buttercream onto your cupcakes or spread with a knife.
Next time I need some After Eight mints to decorate them with!